This post may contains affiliate links. We may earn a commission, at no additional cost to you, if you make a purchase via our links. See our disclosure for more information.
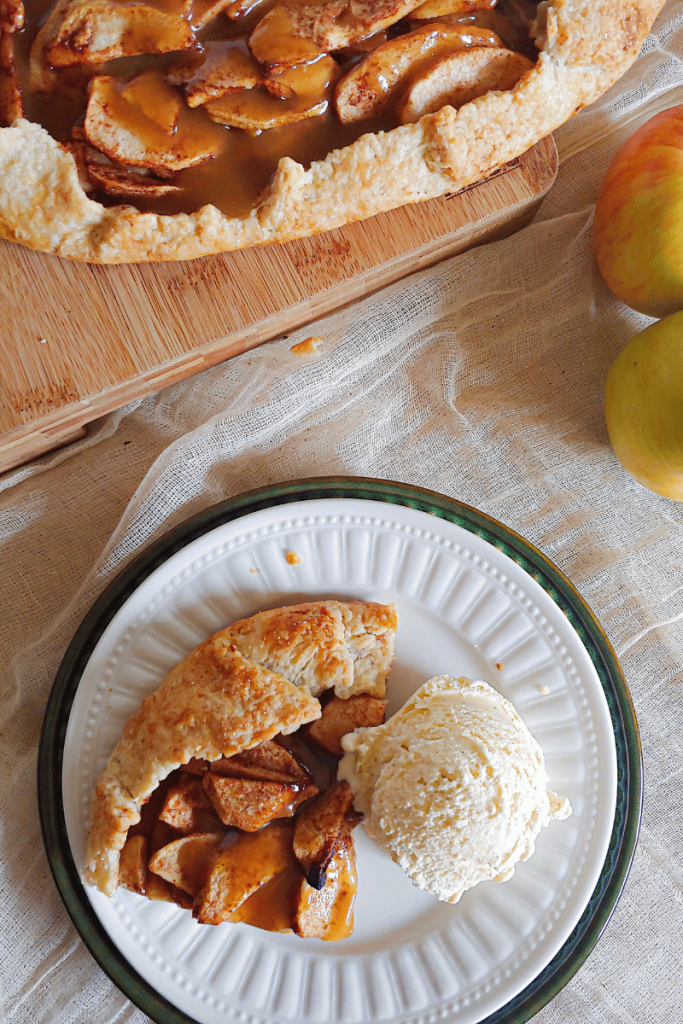
This rustic apple galette is loaded with a delicious cinnamon apple filling encased in a flaky, golden brown crust, then drizzled with a rich caramel sauce that fills every nook and cranny! It’s perfect with a scoop of vanilla ice cream. Make two – it’ll be gone instantly!

It’s apple season! There’s nothing better than baking with fresh apples straight from the farm. We’ve been baking up a ton of apple desserts lately, but I was craving something with a buttery, flaky crust. This delicious apple galette goes pairs so well with my easy puff pastry dough recipe!
If you love delicious apple flavors, don’t miss this blackberry apple crumble! It’s the perfect balance of sweet and tart with a tasty crumb topping. These apple cider scones taste like fall and are sure to be a new favorite!
Why you’ll love this simple Rustic Apple Galette:
What is a galette?
Galette is a French term that means “flat cake.” Most often, you’ll see them filled with fruit, making them basically just an open-faced, free-form pie.
That means that every single part of a galette is customizable, from the crust to the filling to any toppings. The rules are very loose, and no one says you have to use a specific galette dough or certain fillings.
Since it’s meant to be rustic, you don’t have to worry about wasting any pie dough. In fact, with less effort and more of an “I just threw this together” attitude, the galette crust comes out looking even more charming and picture worthy.
Equipment
To make this homemade apple galette, you’ll need to gather a few basic tools and supplies. If you’re using a premade pie crust, you can skip the supplies with a star next to them.
- Rolling Pin*
- Bench scraper or a serving spatula*
- Pastry cutter or chef’s knife*
- Parchment paper
- Baking sheet
- Small bowl
- Whisk
- Spatula
- Pastry brush
Ingredients
- Pastry dough: For this recipe, I use my flaky pastry crust, which is basically a rough puff pastry. It has great flaky layers but is way easier to make than real puff pastry!
- Milk: For this great recipe, we need a small amount for a milk wash, so whatever type of milk you have on hand is fine!
- Apples: I recommend baking this recipe with whatever apples you have, but try mixing sweet and tart types of apples, like Fuji with Granny Smith.
- Sugar: Simple white sugar works best for this recipe.
- Cinnamon: Nothing complements apples better than this sweet spice.
- Apple cider vinegar: A splash of vinegar offsets the sweetness of the apples while maintaining their color. You can also substitute lemon juice instead.
- Brown sugar: I always have some brown sugar around, and when I don’t, I quickly make some more. Learn how to make your own brown sugar with a simple recipe – only two ingredients!
- Butter: Azure Standard grass-fed butter is my absolute favorite, and it has the butteriest butter flavor I have ever had!
- Cream: A good quality, organic heavy cream will make the caramel sauce so smooth.
- Salt: A pinch of kosher salt draws out the sweetness in the caramel sauce.
How to Make a Rustic Apple Galette
Make the dough
- Prepare the flaky pastry crust or make your favorite pie dough.

Prepare the apple filling
- Peel, core, and slice apples into 1/8-inch pieces.
- Place the apples in a small bowl with the sugar, cinnamon, pinch of salt, and apple cider vinegar. Mix gently with your hands until the apples are coated.
Form the galette
- Preheat your oven to 425 degrees F before you start baking.
- Place dough on a piece of parchment paper or a lightly floured surface.
- Roll dough into a large rectangle as thin as you can get it (1/8 inch or so). Transfer dough to a parchment-lined baking sheet (if rolling out on parchment, place that piece on the pan).
- Arrange your apple slices on top of the dough, leaving a 1 to 2-inch border along the outside. Feel free to trim the edges of the crust with a knife before folding the sides (optional).
- Fold the edges of the dough. Use the pinch and fold technique to gently pinch the dough together and then fold the excess to the left (see the pictures). Repeat every 3-4 inches until the entire galette is folded.
- Refrigerate the formed galette until the oven is fully preheated (15-20 minutes).
- Lightly brush the edge of the dough with milk using a pastry brush. Sprinkle lightly with sugar.
- Bake at 425 degrees F for 15-20 minutes. Then, drop the heat to 350 degrees F and let the galette continue to bake for 20-25 minutes until fully cooked.


Prepare caramel sauce
- In a heavy-bottomed saucepan over medium heat, heat sugar and butter until they both melt together and are smooth.
- Once the sugar has fully melted, add a pinch of salt and a splash of heavy cream. The caramel will start to bubble and thicken right away. Whisk constantly. Add more cream bit by bit until all of the cream is in the caramel.
- Continue whisking until the sauce is smooth. It should thicken slightly in the pan but will continue to thicken as it cools.
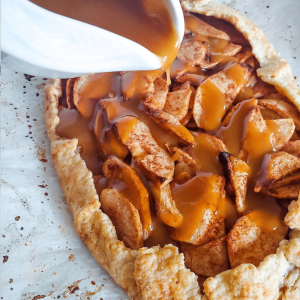
- Let the galette cool slightly and serve drizzled with caramel sauce.
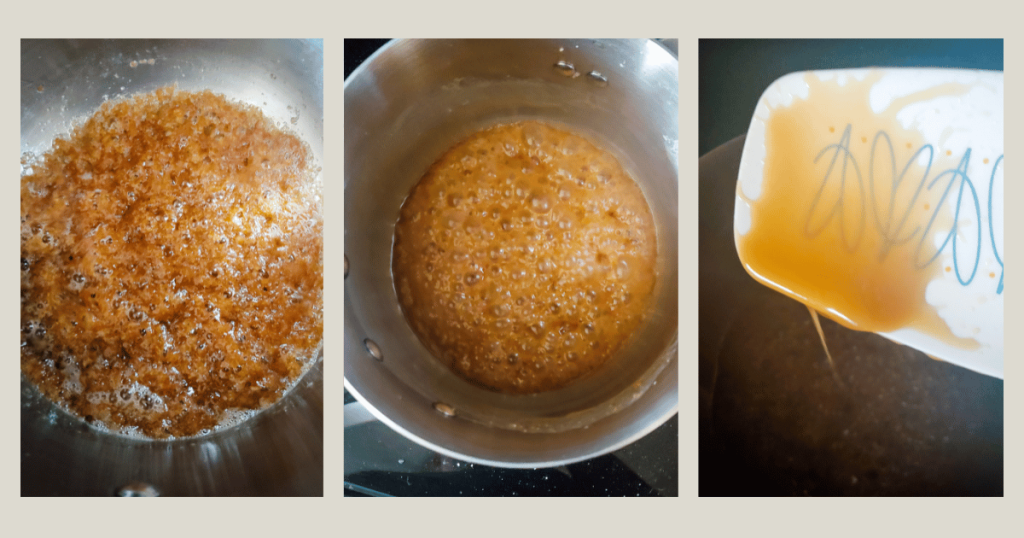
If you’re not sure if your caramel is ready, place a small amount on a plate and put in the fridge for a minute or two. Tilt the plate. If the caramel moves slowly, you’re good!
Storing
Fridge: After baking, store in the fridge for up to 4 days. Be sure to place it in an airtight container to keep it fresh.
Freezer: You can store this galette in the freezer prior to baking, or after baking. Just like traditional apple pie, you might want to prep this easy dessert in large batches ahead of time. When still unbaked, wrap it tightly in foil and store frozen for up to 12 months. If, after baking, you want to freeze it for later, expect it to last no more than 6 months.

🍂🍪 Want more cozy fall recipes?
My brand new recipe ebook, The Cozy Season Bakebook, has 20 seasonal bakes that taste like a love letter to fall!
You can expect all the most iconic fall flavors, like cinnamon apple, pumpkin spice, maple, pecans, and more.
It’s also intentionally low-tech and beginner-friendly, so anyone can bake along!
Serving Suggestions
- When the caramel apple galette is ready, let it cool for 10-15 minutes before drizzling it with the caramel sauce. Of course, you can either decorate the galette before serving or serve the galette with the sauce on the side!
- Just like my Gravenstein apple crisp, it pairs excellently with vanilla ice cream or lightly sweetened whipped cream.
- Don’t worry about perfection, a galette should look homemade! Just say it’s “rustic,” and any rough patches will seem just right!

Tips & Variations
- You can certainly replace this dough with your favorite homemade pie crust or a French pastry crust from the store. You can also use pre-made caramel sauce from the store and simply prepare the apples according to my instructions.
- For your sugar topping prior to baking, you can use turbinado sugar to get a crunchy, finished texture on top of this apple galette.
- If you are making the dough from scratch, I’ve found that the dough was successful, even if I added an extra tablespoon of water or so. As long as the butter is chilled and there are a lot of folds, you should get a nice flaky crust.
- Please do not substitute granulated sugar for the brown sugar in the caramel. You can certainly make caramel with dry granulated sugar, but it is more challenging, and it may crystallize on you. Stick with the brown sugar method.
- If you’re not a fan of caramel sauce, feel free to brush apricot jam over the apples after the galette cools to add a glossy sheen.
- Using a different crust than mine? You may need to adjust your baking temperature according to your recipe instructions.
- No pastry brush? Dip a bit of paper towel or kitchen towel in your milk and dab it on.

FAQs
Most often, you will see a galette served warm, similar to pie. But it’s entirely up to your preference! If you serve it warm, let it rest once it comes out of the oven for a few minutes – this will give the freshly baked fruit a chance to thicken up a bit.
If you like a cold fruit dessert, serve your galette with a scoop of ice cream or yogurt. Keep in mind, a warm galette tastes amazing with a scoop of ice cream or homemade whipped cream. Give it a try; serve it hot the day you make it and cold the day after (if it lasts that long) and see which you prefer!
Absolutely. Since there is baked fruit in the galette, it must be refrigerated (if it lasts that long). It can be helpful to wrap the galette in plastic wrap to avoid condensation and maintain the crisp crust. Since I don’t use plastic wrap, I prefer to store it in an airtight container.
Although I prefer not to peel apples for most recipes, I do for this rustic apple tart. The peels will maintain their texture during baking, adding a chewiness when you want to be able to bite cleanly through the tender apples and flaky crust. It’s worth the hassle to peel your apples to get the perfect texture.
I’m pretty picky about the apples I use for baking. My favorite apples are Gravenstein, which have the perfect slightly tart apple flavor. However, Gravenstein apples have a short season, so instead, I almost always use Granny Smith apples. You can use any firm, crisp apple like Pink Lady or Honeycrisp. I also like to use different types of apples to get a mix of textures and flavors.
Related Recipes
Love fruit galette, seasonal baking, and real food made from scratch? Here are some of my other favorite fruit desserts with cozy fall flavor!
- 70 Delicious Fall Desserts
- Gravenstein Apple Crisp Recipe
- Pumpkin Pie Pudding Cups with Whipped Cream
- Mini Apple Galettes
- Apple Crumb Tarts
- Strawberry and Apple Crumble
Rustic Apple Galette with Caramel Sauce
Equipment
- Rolling Pin
- Bench scraper or a spatula
- Parchment paper
- Spatula
- medium bowl
Ingredients
Pastry Dough
- 1 batch flaky pastry crust , or storebought puff pastry or pie dough
Milk Wash
- 1 tbs whole milk, Do not add to dough – this is for brushing the crust right before baking.
- 1/2 tsp sugar, Use to sprinkle over milk wash before baking.
Apple Filling
- 3 whole apples, peeled, cored, and sliced into 1/8 inch pieces
- 1 tbs sugar
- t tsp cinnamon
- 1 tsp apple cider vinegar
Caramel Sauce
- 1/2 cup brown sugar
- 2 tbs butter, room temperaure
- 1/4 cup heavy whipping cream, room temperature
- 1 pinch kosher salt, for apple filling
- 1 pinch kosher salt, for caramel sauce
Instructions
Prepare the dough
- Prepare the flaky pastry crust or make your favorite pie dough.1 batch flaky pastry crust
Prepare the apples
- Peel, core, and slice the apples into 1/8 inch pieces.3 whole apples
- Place the apples in a bowl with the sugar, cinnamon, pinch of salt, and apple cider vinegar. Mix gently with your hands until the apples are coated.1 tbs sugar, t tsp cinnamon, 1 pinch kosher salt, 1 tsp apple cider vinegar
Prepare galette for baking
- Preheat your oven to 425 degrees F before you start baking. The oven needs to be fully heated before baking.
- Place dough on a piece of parchment paper or a lightly floured surface.
- Roll dough into a large rectangle as thin as you can get it (1/8 inch or so). Transfer dough to a parchment-lined baking sheet (if rolling out on parchment, place that piece on the pan).
- Arrange your apple slices on top of the dough, leaving a 1 to 2-inch border along the outside. Feel free to trim the edges of the crust with a knife before folding the sides (optional).
- Fold the edges of the dough. Use the pinch and fold technique to gently pinch the dough together and then fold the excess to the left (see the pictures). Repeat every 3-4 inches until the entire galette is folded.
- Refrigerate the formed galette until the oven is fully preheated (15-20 minutes).
- Brush the edge of the dough with milk using a pastry brush. Sprinkle lightly with sugar.1 tbs whole milk, 1/2 tsp sugar
- Bake at 425 degrees F for 15-20 minutes. Then, drop the heat to 350 degrees F and let the galette continue to bake for 20-25 minutes until fully cooked.
Prepare caramel sauce
- In a heavy-bottomed sauce pan over medium heat, heat sugar and butter until they both melt together and are smooth.1/2 cup brown sugar, 2 tbs butter
- Once the sugar has fully melted, add the pinch of salt and a splash of cream. The caramel will start to bubble and thicken right away. Whisk constantly. Add more cream bit by bit until all of the cream is in the caramel.1/4 cup heavy whipping cream, 1 pinch kosher salt
- Continue whisking until the sauce is smooth. It should thicken slightly in the pan, but will continue to thicken as it cools.
- Let the galette cool slightly and serve drizzled with caramel sauce.
Notes
- You can certainly replace this dough with your favorite homemade pie crust or a French pastry crust from the store. You can also use pre-made caramel sauce from the store and simply prepare the apples according to my instructions.
- For your sugar topping prior to baking, you can use turbinado sugar to get a crunchy, finished texture on top of this apple galette.
- If you are making the dough from scratch, I’ve found that the dough was successful, even if I added an extra tablespoon of water or so. As long as the butter is chilled and there are a lot of folds, you should get a nice flaky crust.
- Please do not substitute granulated sugar for the brown sugar in the caramel. You can certainly make caramel with dry granulated sugar, but it is more challenging, and it may crystallize on you. Stick with the brown sugar method.
- If you’re not a fan of caramel sauce, feel free to brush apricot jam over the apples after the galette cools to add a glossy sheen.
- Using a different crust than mine? You may need to adjust your baking temperature according to your recipe instructions.
- No pastry brush? Dip a bit of paper towel or kitchen towel in your milk and dab it on.
Nutrition
Did you try this recipe?
Post a photo and tag @milkglasshome!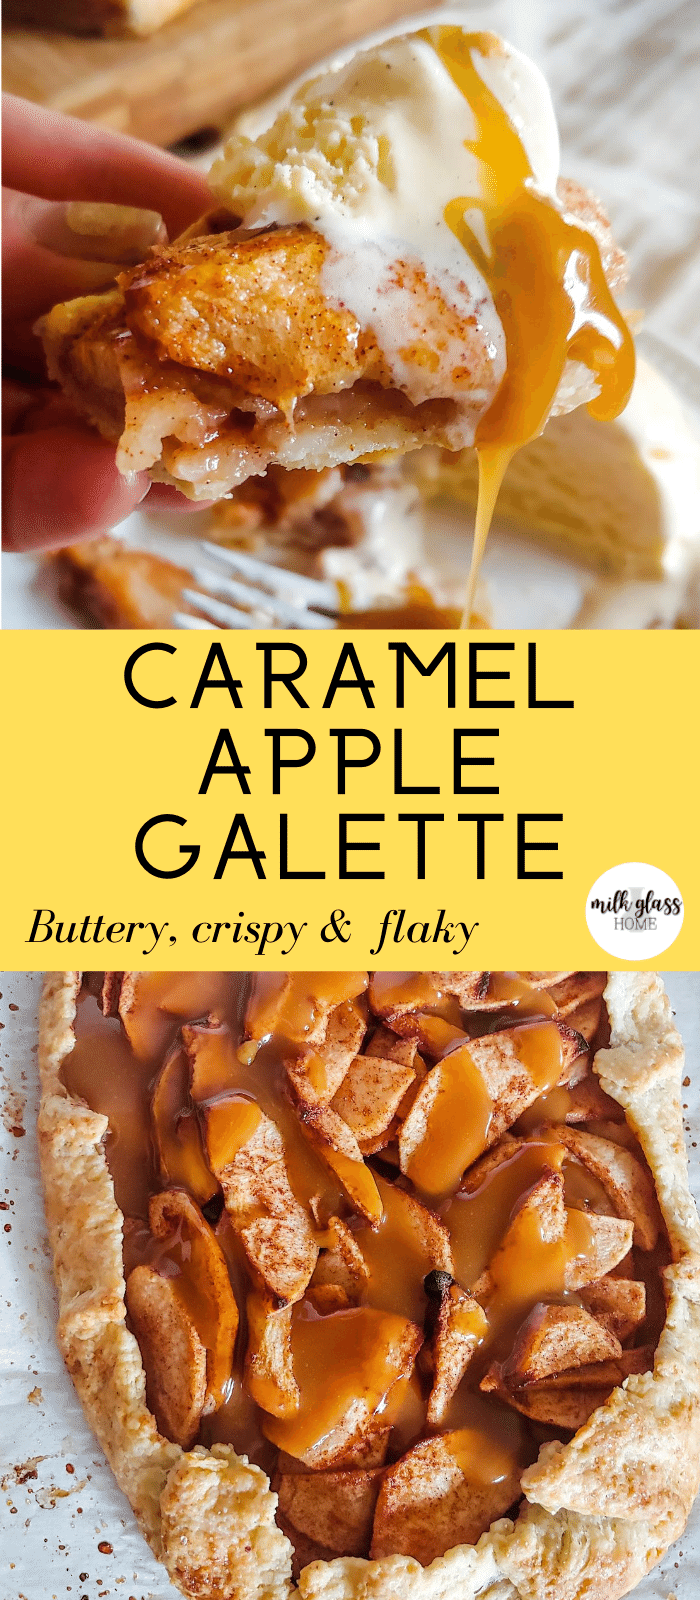
Did you enjoy this rustic apple galette recipe?
Please leave a star rating or a comment to share your thoughts! This is a favorite around here, and I hope you enjoy it, too!


Hi,
I hopped over from Homestead Blog Hop to see your caramel apple galette recipe and I’m so glad I did. Your step by step tutorial was so helpful that I will have no problem making a galette myself. I can’t wait to try it.
I’m so glad you like it, Deborah! It is a fun one to make and so tasty!
Yum! We are cooking up all the apple stuff over here too! I made a pandowdy the other day, I think galette needs to be added to the list! Thank you for sharing at Embracing Home and Family!
Oh my, this looks incredible – that caramel has me drooling and love your clear step by step photos. Thanks for sharing on Fiesta Friday!
What a mouth-watering recipe I love the combination of apples and caramel and this flaky pastry recipe is wonderful, just hoping I can make it gluten free too for my daughter – fingers crossed.
You know, really, this would work for breakfast. I’d be the coolest mom ever!
You definitely would!
Hope you are having a great week and thanks so much for sharing with us at Full Plate Thursday,503. Sure hope to see you again soon!
Miz Helen
Thanks so much! We love sharing with you!
Wow! This looks so good! I have pinned this one to try as soon as I purchase some apples. Thanks so much for sharing such a delicious looking recipe. #HomeMattersParty
Thanks so much for pinning this one. I hope you love it as much as I do! I promise that literally everything is easy, but the crust takes a little love. Enjoy! 🙂
Oh my goodness Rachael… I’m sitting here drooling.
Thank you for sharing your recipe for caramel apple galette at Create, Bake, Grow & Gather this week. I’m delighted to be featuring it at the party tonight and pinning too.
Hugs,
Kerryanne
Kerryanne, Thanks so much for the visit and the feature! I love this recipe and can’t wait to share it with others!
Oh my goodness! Definitely the most drool-worthy dessert I’ve seen in a while xx
Thank you so much! That caramel rain does it for me, too.
Beautiful galette!
Thank you so much!
I can feel the weight gain already just looking at it. Yum!