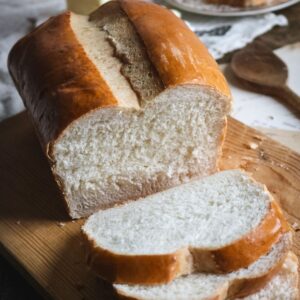
Soft Homemade Sandwich Bread {2 Loaves}
Ultra soft and tender, this homemade sandwich bread is so much better than storebought! You only need about 6 ingredients and can serve up your freshly baked bread on the same day. One batch makes two full loaves so you'll have bread all week! For the very best texture, please use bread flour as noted in the recipe. I know it's an extra expense, but it is such a game-changer and will make your homemade breads feel like you bought them at a bakery!
Equipment
- Two metal loaf pans
- Stand mixer with dough hook
- clean kitchen towel
- Instant thermometer (optional)
- Brush for adding the egg wash
- Wire rack for cooling
Ingredients
To activate the yeast
- 2 cups bread flour always spoon the flour into the measuring cup and level it out (240g)
- 2 cups warm water 105-110 degrees F
- 1 Tbs active yeast
- 3 Tbs white sugar
For the dough
- 4 cups bread flour spoon the flour into the measuring cup and level it out (480g)
- 4 Tbs unsalted butter melted
- 3 tsp kosher salt use half as much if using table salt
For rolling
- 2-3 Tbs additional flour as needed
For the egg wash
- 1 egg
- 1 tsp water
Instructions
Activate the yeast
- Combine water, yeast, 2 cups of bread flour, and sugar in the bowl of a stand mixer or your mixing bowl. Allow to sit undisturbed in a warm place for about 15-20 minutes or until you see the yeast start start to bubble and foam.2 cups bread flour, 2 cups warm water, 1 Tbs active yeast, 3 Tbs white sugar
Knead the dough
- Then, add the remaining flour, melted butter, and salt, and begin kneading on low speed with a dough hook. If using your hands, it will take a while (probably 20-30 minutes), but it is totally doable.4 cups bread flour, 4 Tbs unsalted butter, 3 tsp kosher salt
- Let the mixture knead until the dough ball is soft and smooth. I always recommend doing the windowpane test. If you pull on the dough, it should stretch (not rip) and ideally, you should be able to stretch it thin enough to see through it.If it isn’t exactly that thin but still stretchy, that’s totally fine. I just let my mixer run for about 10-15 minutes and check on the dough a couple of times.
First rise
- At this point, the dough is ready to do its first rise. Add a a splash of oil to a large mixing bowl, and spread it evenly, then place the dough on top. Cover with a kitchen towel and place in a warm spot, like on your stovetop. Let it rise until doubled (about 45 minutes to an hour).
Shape the loaves
- Then, sprinkle flour generously over a clean work surface and dump the dough from the mixing bowl. Divide the dough into two even sections and set one piece to the side.2-3 Tbs additional flour as needed
- Using your fingers, spread one half of the dough out into a rectangular shape. It doesn’t need to be perfect; just generally rectangular. I make mine roughly about 8 by 12-14 inches or so.
- Tightly roll the rectangle into a log. Flip it over and use your fingers to pinch together any seams you’ve made.
- Fold the left and right sides of the log together, pinching the dough where they meet to hold it together.The goal for this step is to pull the dough from the longer sides together. Place your hands under each long side of the log with the joined seam facing up. Carefully push upwards to stretch the sides up and then press together so they match up in the middle. Pinch the seams again.
- At this point, you can flip the log over. If you need to, you can gently roll or pull the log to make it a better shape for the pans. The dough will grow as it rises, so it doesn’t need to be the full length of the pan.
Second rise
- Place dough in an oiled loaf pan lined with a strip of parchment for easy lifting (optional). Cover with a clean kitchen towel and let the dough rise for the final time (45 minutes to an hour) in a warm environment. You will know the bread is ready to bake when the dough rises about 1 – 1 ½ inch taller than the pans.
Bake the loaves
- Then, preheat oven to 375 F. Just before baking, brush loaves with egg wash (whisk together the egg and tsp of water). If you’d like, you can use a bread lame or sharp knife to score down the center. Press down about 1 - 1 ½ inches.1 egg, 1 tsp water
- Bake at 375 F for 30 minutes. If you’re worried about doneness, you can use an instant read thermometer to check the center. It should read about 195-205 F when properly baked.
- Let the bread cool in the pans for a bit, then transfer to a wire rack. Cool completely to room temperature before slicing. Store in an airtight container either in the fridge or on the counter.
Notes
Measure flour properly
One of the most important steps in this recipe is to use the right amount of flour. You do not necessarily have to have a kitchen scale, but you do need to know how to measure flour properly. You need to spoon flour into your measuring cup, then level it flat. If you scoop the measuring cup into your bag or container, you will almost always add more flour than you need, which can cause your bread to be dry. Otherwise, one cup of flour generally weighs about 120-125g. You can use a digital kitchen scale to measure out precise quantities every single time.Use fresh yeast
Always make sure your yeast is fresh and active before getting started! If the yeast doesn't foam and bubble up in the first step, it may be dead and won't rise.Watch your dough
The actual rising time will always vary depending on the temperature of your kitchen and other little micro factors. I recommend following your bread and its visual cues and not just following a timer. For the first rise, look for dough that has doubled in volume. If you poke the dough, the indentation should disappear in about 10 seconds. For the second rise, the center of the loaves should be at least 1 inch above the sides of the pan. You can see what the loaves look like before I bake in the recipe photos. If you go too long, the bread will be overproofed and will start to collapse and sink.Servings: 2 loaves